Spring MVC
MVC 패턴에 관한 내용은 이전 게시물을 참고하길 바란다.
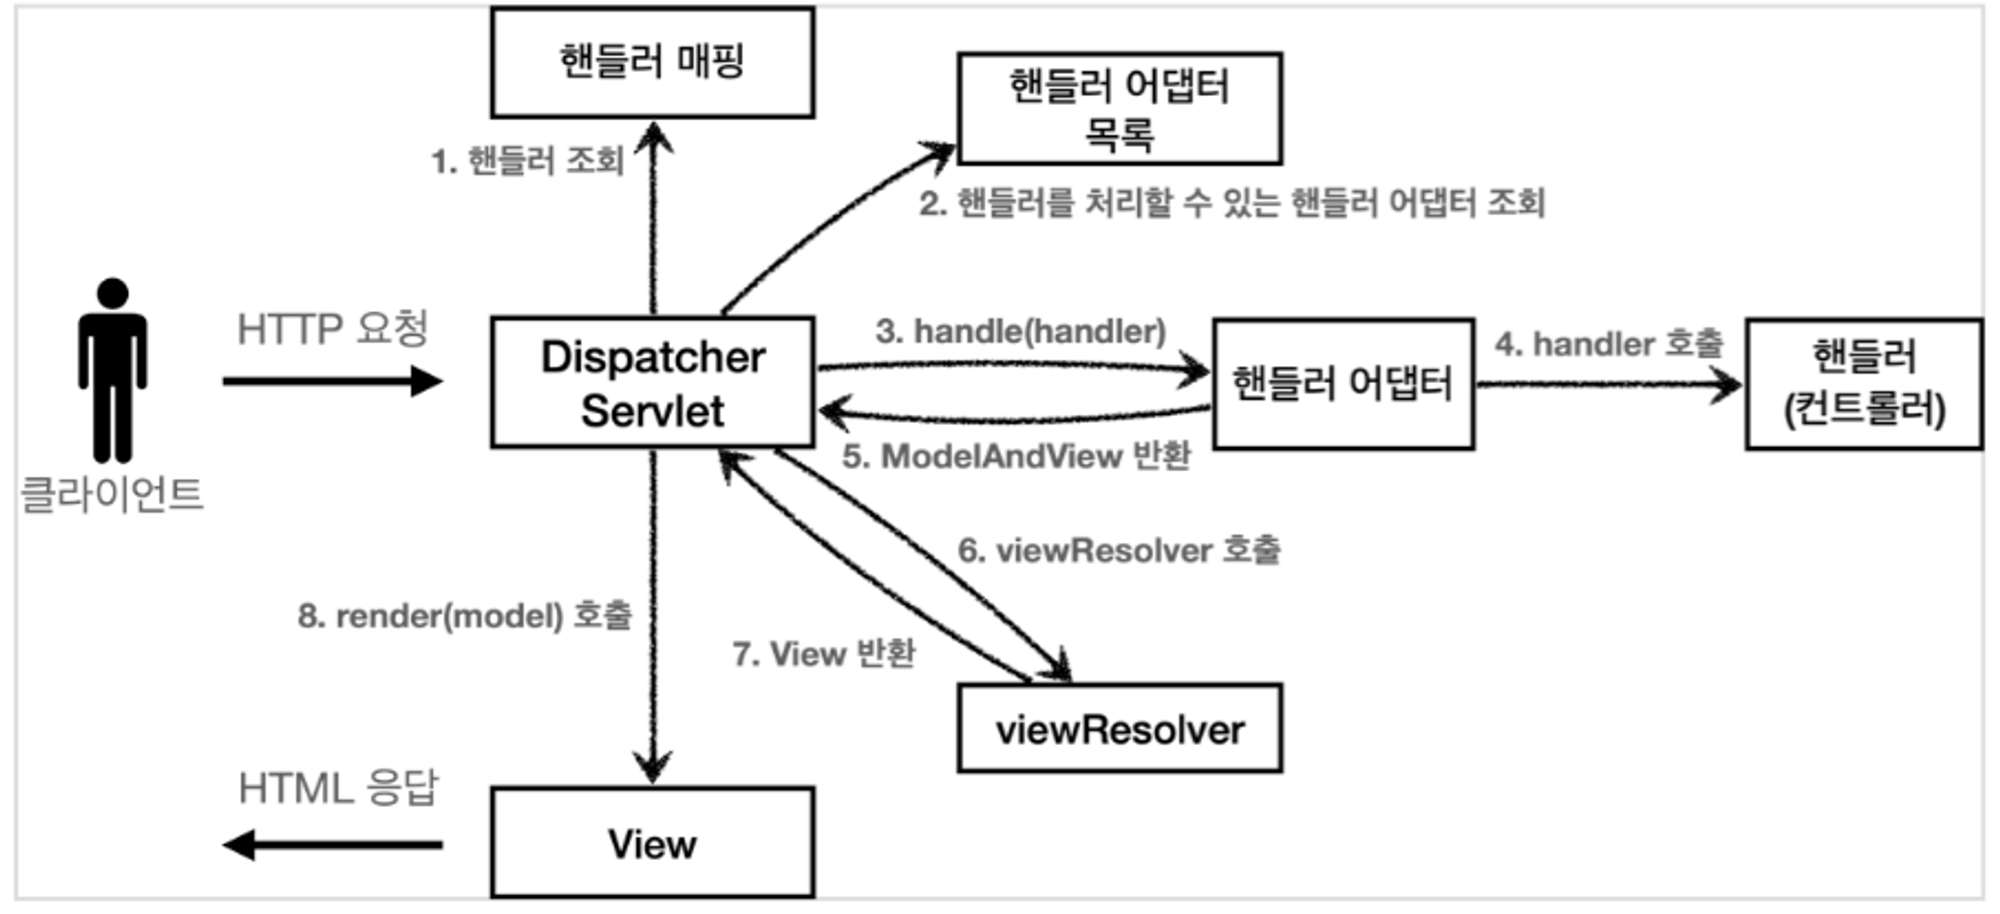
Spring MVC에서는 Model 2 Architecture를 기반으로 Front Controller 패턴을 프레임워크에서 제공한다.
Spring MVC의 구조
 (출처 : https://catsbi.oopy.io/f52511f3-1455-4a01-b8b7-f10875895d5b)
DispatcherServlet (Front Controller)
모든 클라이언트의 요청은 Front Controller인 DispatcherServlet이 전달받는다.HandlerMapping
클라이언트의 요청 URL을 어떤 Controller가 처리할지 결정한다.HandlerAdapter
매핑된 핸들러(Controller)를 실제로 호출한다.ModelAndView
Controller에서 처리한 데이터(Model) 및 화면(View)에 대한 정보를 보유한 객체.
처리한 결과를 이 객체를 통해 돌려준다.ViewResolver
결과를 보여줄 실제 View 파일을 결정한다.View
실제 응답화면을 생성
Spring MVC의 구현
1. DispatcherServlet 등록
web.xml에 DispatcherServlet을 등록한다.
보통 STS를 통해 Spring 프로젝트를 생성할 경우 자동으로 세팅되어 있다.
DispatcherServlet에 요청이 전달되기 전/후 적용할 Filter도 여기에 세팅한다.
<!-- web.xml -->
<?xml version="1.0" encoding="UTF-8"?>
<web-app version="2.5" xmlns="http://java.sun.com/xml/ns/javaee"
  xmlns:xsi="http://www.w3.org/2001/XMLSchema-instance"
  xsi:schemaLocation="http://java.sun.com/xml/ns/javaee https://java.sun.com/xml/ns/javaee/web-app_2_5.xsd">

  <!-- servlet과 관련되지 않은 일반 설정은 root-context.xml에서 한다. -->
  <!-- The definition of the Root Spring Container shared by all Servlets and Filters -->
  <context-param>
    <param-name>contextConfigLocation</param-name>
    <param-value>/WEB-INF/spring/root-context.xml</param-value>
  </context-param>

  <!-- contextConfigLocation 으로 정의된 context 설정 파일들을 읽어 모두 load한다. -->
  <!-- Creates the Spring Container shared by all Servlets and Filters -->
  <listener>
    <listener-class>org.springframework.web.context.ContextLoaderListener</listener-class>
  </listener>

  <!-- 여기서 DispatcherServlet을 정의한다. -->
  <!-- Processes application requests -->
  <servlet>
    <servlet-name>appServlet</servlet-name>
    <servlet-class>org.springframework.web.servlet.DispatcherServlet</servlet-class>
    <!-- servlet과 관련된 설정은 servlet-context.xml에서 한다. -->
    <init-param>
      <param-name>contextConfigLocation</param-name>
      <param-value>/WEB-INF/spring/appServlet/servlet-context.xml</param-value>
    </init-param>
    <load-on-startup>1</load-on-startup>
  </servlet>

  <servlet-mapping>
    <servlet-name>appServlet</servlet-name>
    <url-pattern>/</url-pattern>
  </servlet-mapping>

  <!-- Filter 설정 -->
  <filter>
    <filter-name>encodingFilter</filter-name>
    <filter-class>org.springframework.web.filter.CharacterEncodingFilter</filter-class>
    <init-param>
      <param-name>encoding</param-name>
      <param-value>UTF-8</param-value>
    </init-param>
  </filter>

  <filter-mapping>
    <filter-name>encodingFilter</filter-name>
    <url-pattern>/*</url-pattern>
  </filter-mapping>

</web-app>
최초 Spring 컨테이너가 생성될 때 root-context.xml을 읽고
이후 dispatcherServlet이 생성될 때 servlet-context.xml을 읽는다.
따라서 dispatcherServlet과 관련된 부분은 root에 넣어서는 안 된다.
2. Controller 구현, Context 설정
@Controller
public class TodoController {
  @Autowired
  TodoService service;

  @GetMapping({"/", "/list"})
  public String list(Model model) {
    List<Todo> list = service.selectAll();
    model.addAttribute("list", list);
    return "list";
  }
}
<beans>
  ...
  <context:component-scan base-package="com.mvc.controller" />
  ...
</beans>
Controller를 구현 후 @Controller 어노테이션을 붙인다.
servlet-context.xml에서 component-scan한다.
Web과 관련 없는 비즈니스 로직 (Service, DAO 등)은
root-context.xml에 세팅한다.
자세한 세팅 방법은 Spring DI를 참고하자.
3. ViewResolver 설정
<beans>
  ...
  <!-- Resolves views selected for rendering by @Controllers to .jsp resources in the /WEB-INF/views directory -->
  <beans:bean class="org.springframework.web.servlet.view.InternalResourceViewResolver">
    <beans:property name="prefix" value="/WEB-INF/views/" />
    <beans:property name="suffix" value=".jsp" />
  </beans:bean>
  ...
</beans>
View를 연결하기 위해 ViewResolver를 설정하자.
DispatcherServlet과 마찬가지로 프로젝트 생성시 기본 세팅된다.
Controller
RequestMapping
요청 URL mapping 정보를 설정한다.
method를 생략할 경우 기본 GET방식으로 mapping된다.
Spring 최신 버전에서는
@GetMapping, @PostMapping, @PutMapping, @DeleteMapping 등으로 사용가능하다.
Ant 스타일의 URI 패턴을 지원한다.
(? : 하나의 문자열 / * : 하나 이상의 문자열 / ** : 하나 이상의 디렉토리)
@Controller
@RequestMapping("/user")
public class UserController {
  @Autowired
  private UserService userService;

  @RequestMapping(value = "/login", method = RequestMethod.GET)
  public String login() {
    return "login";
  }

  @RequestMapping(value = "/login", method = RequestMethod.POST)
  public String login(@RequestParam Map<String, String> map, Model model, HttpSession session) {
    MemberDto memberDto = userService.login(map);
    // login process..
    return "index";
  }

  @RequestMapping("/logout")
  public String logout(HttpSession session) {
    session.invalidate();
    return "redirect:/";
  }
이 때 매핑되지 않은 URL에서의 요청이 들어오면 404에러가 발생한다.
Parameter Type
메소드의 Parameter를 통해 필요한 데이터들을 전달받아 사용할 수 있다.
| Parameter Type | 설명 |
|---|---|
| HttpServletRequest HttpServletResponse HttpSession | 필요시 Servlet API 사용 |
| InputStream, Reader | 요청 컨텐츠 직접 접근할 때 사용 |
| OutputStream, Writer | 응답 컨텐츠 생성할 때 사용 |
| @PathVariable | URI 경로 변수에 접근할 때 사용 |
| @RequestParam | HTTP 요청 파라미터를 매핑 |
| @RequestHeader | HTTP 요청 헤더를 매핑 |
| @CookieValue | HTTP 쿠키 매핑 |
| @RequestBody | HTTP 요청 body에 접근할 때 사용 |
| Map, Model, ModelMap | View에 전달할 Model data 설정할 때 사용 |
| DTO | HTTP 요청 Parameter를 저장한 객체 기본적으로 클래스 이름을 모델명으로 사용 @ModelAttribute로 모델명 설정 가능 |
@RequestParam
QueryString 으로 전달 받은 값을 Parameter로 매핑하여 받아올 때 사용한다.
required 및 defaultValue를 설정할 수 있으며,
Map을 이용하여 한번에 여러 개를 받을 수도 있다.
// http://localhost/index?name=정무&age=30
@GetMapping("/index")
public String home(
  @RequestParam(value="name", required=false) String name,
  @RequestParam(value="age", defaultValue="25") int age) {
  // do something...
  return "index";
}

@GetMapping("/index")
public String home(
  @RequestParam Map<String, String> map) {
  // do something...
  return "index";
}
DTO Mapping
DTO(JavaBean 객체)의 Setter와 동일한 name으로 data를 보내면 DTO로 전달 받을 수 있다.
// GuestBookDto에 setSubject, setContent 메소드가 있다고 할 때
// form에서 name="subject", name="content"로 보내면 해당 객체로 받아 사용 가능
@PostMapping("/write")
public String write(GuestBookDto guestBookDto, Model model) {
  // do something...
  return "list";
}
기타
@PathVariable, @RequestBody 는 REST API 게시물을 참고하자.
나머지는 필요할 때 찾아보도록 하자.
View
ViewResolver를 통해 prefix + ViewName + suffix로 변경되어 해당 파일과 매핑된다.
View 이름 명시적 지정
Controller의 메소드를 통해 String 또는 ModelAndView로 리턴하면 View 이름을 명시적으로 지정할 수 있다.
ModelAndView 객체의 생성자나 setViewName 메소드를 이용할 수 있다.
이 때 view 이름에 redirect: 접두어를 붙이면 redirect가 된다.
@GetMapping("/hello")
public ModelAndView hello() {
  ModelAndView mav = new ModelAndView("hello");
  return mav;
}

@GetMapping("/hello")
public ModelAndView hello() {
  ModelAndView mav = new ModelAndView();
  mav.setViewName("hello");
  return mav;
}

@GetMapping("/hello")
public String hello() {
  return "redirect:hello";
}
View 자동 지정
메소드의 리턴 타입이 Model, Map이거나
void이면서 Response 타입의 파라미터가 없다면 URL로부터 view이름이 결정된다.
// view name은 hello가 됨
@GetMapping("/hello")
public Map<String, Object> hello() {
  Map<String, Object> model = new HashMap<String, Object>();
  return model;
}
Model
컨트롤러에서 View에 전달하는 데이터를 Model이라고 한다.
Map, Model, ModelMap
Controller 메소드의 parameter를 통해 전달받아 사용한다.
@GetMapping("/hello")
public String hello(Map model) {
  model.put("message", "hello!");
  return "hello";
}

@GetMapping("/hello")
public String hello(ModelMap model) {
  model.addAttribute("message", "hello!");
  return "hello";
}

@GetMapping("/hello")
public String hello(Model model) {
  model.addAttribute("message", "hello!");
  return "hello";
}
ModelAndView
ModelAndView객체로 리턴할 경우 Model을 담아보낼 수 있다.
@GetMapping("/hello")
public ModelAndView hello() {
  ModelAndView mav = new ModelAndView();
  mav.setViewName("hello");
  mav.addObject("message", "hello!");
  return mav;
}
@ModelAttribute
해당 어노테이션을 사용한 별도의 메소드가 추가로 모델 객체를 생성한다.
@ModelAttribute("message")
public String message() {
  return "bye bye";
}
Spring Web Appication의 동작 정리
- Web Application이 실행되면 WAS에 의해 web.xml이 loading
- web.xml에 등록된 ContextLoaderListener가 생성
- root-context.xml을 load -> 비즈니스 로직 관련 객체 (Service, DAO) 생성
- client로부터 요청(request)이 들어오면 DispatcherServlet 생성
- 이 때 server-context.xml을 load -> 웹 관련 객체 (Controller) 생성